Adding Images to a Web Page
Images can be placed on a web page by using the <img /> element.
<img src="myImage.gif" alt="Image example"/>
The src attribute specifies the file name of the image and any required path.
As with the href attribute, the complete Internet address can be specified,
a relative address, or just the filename if the image is in the same directory as the web page.
alt is now a required attribute.
The text assigned to it serves a multi-purpose function.
It is displayed in the following situations:
- while the image is downloading
- as an alternative in older browsers which cannot display graphics
- if automatic image downloading has been disabled
- if the image cannot be found
- when the mouse hovers over the image (Note in more standard-compliant browsers, the
titleattribute should more properly be used for this.
The size of the image can be controlled by specifying the width and the height of the image.
This may be done by using the width and height attributes.
<img src="myImage.gif" alt="Image example" title="Image example" width="25" height="25" />
Specifying one value only will have the effect of re-sizing the image proportionately.
TopImages as Links
Instead of using text to specify a link, an image can be used instead.
<a href="http://www.myWebSite.co.uk/home.html"><img src="myHomePage.gif" alt="Home Page"></a>

By default a border appears around the image. To remove it, use the border style sheet property with a value of "none".
img {border: none;}
Top
Aligning Images and Text

By default, as with the image above and this paragraph, the image is left aligned and subsequent text continues beneath it.
To wrap the text around the image the float property can be used.
<img src="camel.gif" alt="camel" style="float: left;" />
float: left; causes the image to float to the left of the subsequent text.
Once the text extends below the bottom of the image, it will actually wrap round and continue beneath the image.
If this paragraph is not doing this resize the browser window and you will get the desired effect.
You will note that in the example above it looks a little crowded as there is no no space between the image and text. This can be remedied by applying a margin to the image as shown below and achieving the results seen in this paragraph.
<img src="camel.gif" alt="camel" style="float: left; margin-right: 10px" />
The image can equally as well be floated to the right of the text.
Note here that the margin-left property has been set to afford some space between the text and image.
<img src="camel.gif" alt="camel" style="float: right; margin-left: 10px" />Top
Image Maps
The <map> and <area> elements are used to define areas of an image known as an image map.
By specifying co-ordinates within the image, a hyperlink refeference can be supplied and when that part of the image is clicked, the specified link is activated.
A typical example of this is a geographical map where clicking on a particular area will display a page containing information relevant to that area.
In order to link an image to the <map> element the usemap attribute is used.
This references the id given to the <map> element.
The name attribute may also be used but this has been deprecated in favour of the id attribute.
Within the <map> element a series of <area> elements are used to specify co-ordinates within the the image.
Hover over the shapes in the image below to see how it works.
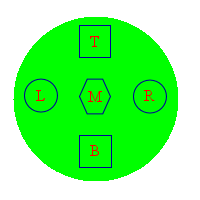
How the co-ordinates are specified depends on the 'shape' of the required area.
The shape attribute has three values: "rect"(rectangle), "circle" and "poly" (polygon).
The co-ordinate values that must be supplied for each type are:
- rectangle
- left-x, top-y, right-x, bottom-y
- circle
- centre-x, centre-y, radius
- polygon
- x1, y1, x2, y2, ....xn,yn
These are pairs of x and y co-ordinates which define the perimeter of the required area.
   <img usemap="#amap" src="../images/imageMap.gif" alt="image map example" />
   <map id="amap" name="amap">
      <area shape="rect" coords="79,25,109,57," href="#" title="This is the top square" />
      <area shape="rect" coords="79,135,109,167" href="#" title="This is the bottom square" />
      <area shape="circle" coords="149,98,18" href="#" title="This is the right circle" />
      <area shape="circle" coords="40,96,18" href="#" title="This is the left circle" />
      <area shape="poly" coords="88,78,102,78,110,96,102,113,88,113,78,96" href="#"
     	 title="This is the middle hexagon" />
   </map>
Top

